Crafting Perfect Little Art Doll Hands: The Art Doll Maker’s Dilemma
One of the most challenging—and sometimes exasperating—parts of making an art doll is crafting those intricate, tiny hands. The delicate digits might be small, but the process of creating them is a monumental task. Anyone who’s ever attempted this, knows exactly what I’m talking about!
The difficulty lies in turning the fabric that forms the fingers inside out. To achieve a neat, seamless look, the fabric needs to be cut very close to the seam, eliminating any excess bulk. However, this is where the challenge begins. Cutting the fabric that close to the seam is a double-edged sword: it’s essential for a clean finish, but it also increases the risk of the fabric unraveling—turning a tiny triumph into a big disaster.
What’s a doll maker to do? Tools like turning tubes and liquid fray solutions are often the go-to aids. But as helpful as they are, they come with their own set of challenges. Turning tubes, for instance, are often too large to fit into the slender channels of those tiny digits, making the task more difficult rather than easier. And while liquid fray preventers can save a seam from unraveling, they tend to stiffen the fabric, which adds another layer of difficulty when trying to turn the fabric inside out.
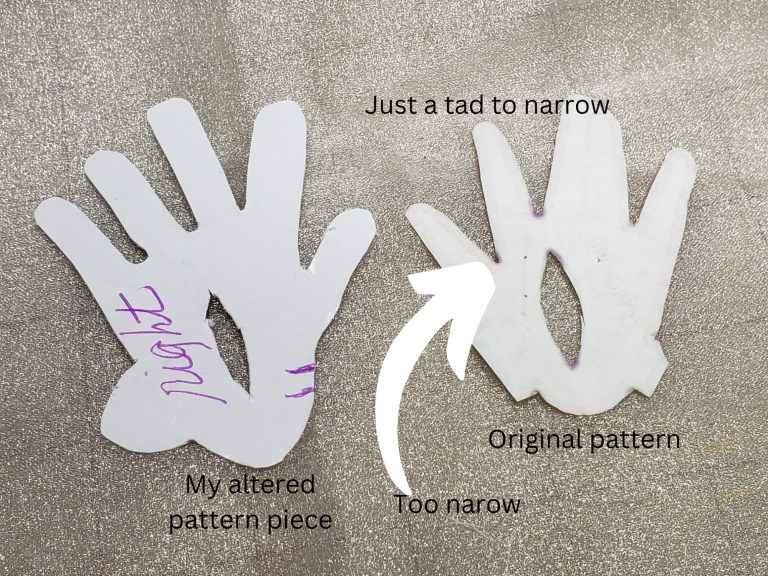
Every challenge comes with the opportunity to learn. Following the advice of Adele Po, who takes as much as three days to sculp a paper clay doll foot, I took a closer look at the pattern I was using to create my hands and analyzed it carefully. It turns out that the pattern was inaccurate. The gaps between the fingers were not wide enough, and the fingers themselves were too narrow. By making the fingers just a tad wider and longer, I found that the smallest turning tube I had, fit easily into the digit slot,


enabling the fabric to turn without too much difficulty.
Timing was a key, as well. After applying the fray check, I worked quickly to trim the excess fabric and turn the hand while the solution was still tacky. As the fabric began to stiffen, I misted it with water to keep it pliable.
But the learning did not stop there. Akira Blount believed strongly that "without experimenting you will never know what you can do". So, after the hand was turned, I carefully studied the tiny rods of pipe cleaners that go into each digit, measuring the length, folded the pipe cleaner in half, twisted the two halves together tightly and cut it to the right length. The cut ends of the pipe cleaners must be wrapped with masking tape to keep the wire from poking through the hand. Then, they are inserted into each digit. Using my calipers, I inserted pea size balls of stuffing at the bottom of each digit, using the calipers to push some of the stuffing up the finger to create the pads found in the human hand. With the exception of the thumb. There I made a jelly-bean shaped wad of stuffing and followed the same process. Pea size wads of stuffing were also added where the wrist is, on both sides of the hand.
Now it is time to hand stich the opening used to stuff the hand, shut. I have found that using the slenderest needle with the sharpest point works the best. I use one strand of fine treat to ladder stitch the opening shut, and then do a U-turn and resew in between the stiches I sewed to close the gap. This technique seams to give me the cleanest looking seam closure.
I documented the process in a video you may find helpful.
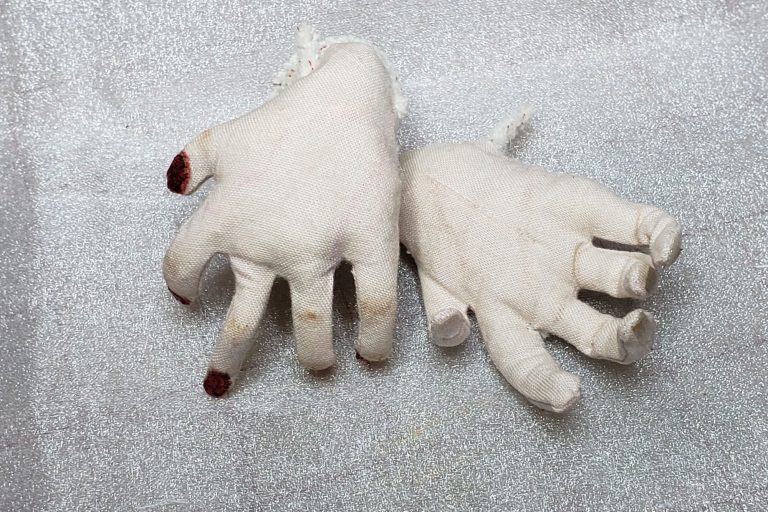
For the first time—after fifteen dolls and countless attempts at making art doll hands—I achieved two perfect hands in a row!
Each doll provides a new challenge and opportunities to elevate what one has always done, so that one will get more than what one has always gotten.
By Nora Sims
We need your consent to load the translations
We use a third-party service to translate the website content that may collect data about your activity. Please review the details in the privacy policy and accept the service to view the translations.
